| .. | ||
| README.md | ||
Docker Cheat Sheet
Want to improve this cheat sheet? See the Contributing section!
Содержание
- Почему Docker
- Предпосылки
- Установка
- Контейнеры
- Образы
- Сеть
- Реестр и репозиторий
- Dockerfile
- Слои
- Ссылка
- Тома
- Отображение портов
- Лучшая практика
- Безопасность
- Советы
- Содействие
Почему Docker
"С Docker разработчики могут создавать любое приложение на любом языке, используя любую инструментальную цепочку. Приложения помещаются в контейнер - становятся полностью переносимы и могут работать где угодно - на компьютерах под управлением OS X и Windows, серверах QA, работающих под управлением Ubuntu в облаке, и виртуальных машинах производственного центра обработки данных Red Hat.
Разработчики могут быстро начать работу, начиная с одного из 13 000 приложений, доступных на Docker Hub. Docker управляет и отслеживает изменения и зависимости, что облегчает для системных администраторов понимание того, как работают приложения, созданные разработчиками. И с Docker Hub разработчики могут автоматизировать свой процес сборки и совместно использовать артефакты с сотрудниками через публичные или частные репозитории.
Docker помогает разработчикам создавать и отправлять более качественные приложения быстрее " -- Что такое Docker
Предпосылки
Я использую Oh My Zsh вместе с Docker plugin для автозаполнения команд docker. Возможно у вас другой подход.
Linux
Ядро 3.10.x [минимальное требование] (https://docs.docker.com/engine/installation/binaries/#check-kernel-dependencies) для Docker.
MacOS
10.8 “Mountain Lion” или более новый.
Установка
Linux
Быстрый и простой скрипт установки, предоставляемый Docker:
curl -sSL https://get.docker.com/ | sh
Если вы не хотите запускать случайный сценарий оболочки, см. Инструкции по установке на ваш дистрибутив.
Если вы являетесь полноправным новичком Docker, вы должны следовать [сериям учебников] (https://docs.docker.com/engine/getstarted/) сейчас.
macOS
Скачать и установить Docker Community Edition. если у вас есть Homebrew-Cask, просто введите brew cask install docker.
Или загрузите и установите Docker Toolbox. Docker для Mac это хорошо, но это не совсем так, как установка VirtualBox.
См. Сравнение.
** ПРИМЕЧАНИЕ ** Docker Toolbox является устаревшим. вы должны использовать Docker Community Edition, см. (Docker Toolbox)[https://docs.docker.com/toolbox/overview/]
После установки Docker Community Edition щелкните значок докера. Затем запустите контейнер:
docker run hello-world
Вот и все, у вас есть работающий контейнер Docker.
Если вы являетесь полноправным новичком докеров, вы должны, вероятно, исследовать [серию учебников] (https://docs.docker.com/engine/getstarted/) сейчас.
Контейнеры
Ваш основной изолированный процесс Докера. Контейнеры - это виртуальные машины, поскольку потоки относятся к процессам. Или вы можете думать о них как о chroot на стероидах.
Жизненный цикл
docker createсоздает контейнер, но не запускает его.docker renameпозволяет переименовать контейнер.docker runсоздает и запускает контейнер за одну операцию.docker rmудаляет контейнер.docker updateобновляет ограничения ресурсов контейнера.
Обычно, если вы запускаете контейнер без параметров, он запускается и останавливается немедленно, если вы хотите его запустить, вы можете использовать команду, docker run -td container_id это будет использовать опцию -t который будет выделять псевдо-TTY сессию и -d который автоматически отсоединяет контейнер (запускает контейнер в фоновом режиме и показыват ID контейнера).
Если вам нужен переходный контейнер, docker run --rm удалит контейнер после его остановки.
Если вы хотите сопоставить каталог на хосте с контейнером докера, docker run -v $HOSTDIR:$DOCKERDIR. Также смотрите Тома.
Если вы хотите удалить также тома, связанные с контейнером, удаление контейнера должно включать -v измените примерно так docker rm -v.
Существует также логирование доступны для отдельных контейнеров в докерах 1.10. Чтобы запустить докер с помощью специального лог журнала (например, в syslog), используйте docker run --log-driver=syslog.
Другим полезным вариантом является docker run --name yourname docker_image потому что, когда вы укажете --name внутри команды run это позволит вам запускать и останавливать контейнер, вызывая его с именем, которое вы указали при его создании.
Запуск и остановка
docker startзапускает контейнер, чтобы он работал.docker stopостанавливает запущенный контейнер.docker restartостанавливается и запускает контейнер.docker pauseприостанавливает работу контейнера, "замораживает" его на месте.docker unpauseснимает "заморозку" контейнера.docker waitблокирует до остановки контейнера.docker killпосылает SIGKILL к запущеннному контейнеру.docker attachбудет подключаться к работающему контейнеру.
If you want to integrate a container with a host process manager, start the daemon with -r=false then use docker start -a.
If you want to expose container ports through the host, see the exposing ports section.
Restart policies on crashed docker instances are covered here.
CPU Constraints
You can limit CPU, either using a percentage of all CPUs, or by using specific cores.
For example, you can tell the cpu-shares setting. The setting is a bit strange -- 1024 means 100% of the CPU, so if you want the container to take 50% of all CPU cores, you should specify 512. See https://goldmann.pl/blog/2014/09/11/resource-management-in-docker/#_cpu for more:
docker run -ti --c 512 agileek/cpuset-test
You can also only use some CPU cores using cpuset-cpus. See https://agileek.github.io/docker/2014/08/06/docker-cpuset/ for details and some nice videos:
docker run -ti --cpuset-cpus=0,4,6 agileek/cpuset-test
Note that Docker can still see all of the CPUs inside the container -- it just isn't using all of them. See https://github.com/docker/docker/issues/20770 for more details.
Memory Constraints
You can also set memory constraints on Docker:
docker run -it -m 300M ubuntu:14.04 /bin/bash
Capabilities
Linux capabilities can be set by using cap-add and cap-drop. See https://docs.docker.com/engine/reference/run/#/runtime-privilege-and-linux-capabilities for details. This should be used for greater security.
To mount a FUSE based filesystem, you need to combine both --cap-add and --device:
docker run --rm -it --cap-add SYS_ADMIN --device /dev/fuse sshfs
Give access to a single device:
docker run -it --device=/dev/ttyUSB0 debian bash
Give access to all devices:
docker run -it --privileged -v /dev/bus/usb:/dev/bus/usb debian bash
more info about privileged containers here
Info
docker psshows running containers.docker logsgets logs from container. (You can use a custom log driver, but logs is only available forjson-fileandjournaldin 1.10).docker inspectlooks at all the info on a container (including IP address).docker eventsgets events from container.docker portshows public facing port of container.docker topshows running processes in container.docker statsshows containers' resource usage statistics.docker diffshows changed files in the container's FS.
docker ps -a shows running and stopped containers.
docker stats --all shows a running list of containers.
Import / Export
docker cpcopies files or folders between a container and the local filesystem.docker exportturns container filesystem into tarball archive stream to STDOUT.
Executing Commands
docker execto execute a command in container.
To enter a running container, attach a new shell process to a running container called foo, use: docker exec -it foo /bin/bash.
Images
Images are just templates for docker containers.
Lifecycle
docker imagesshows all images.docker importcreates an image from a tarball.docker buildcreates image from Dockerfile.docker commitcreates image from a container, pausing it temporarily if it is running.docker rmiremoves an image.docker loadloads an image from a tar archive as STDIN, including images and tags (as of 0.7).docker savesaves an image to a tar archive stream to STDOUT with all parent layers, tags & versions (as of 0.7).
Info
docker historyshows history of image.docker tagtags an image to a name (local or registry).
Checking Docker Version
It is very important that you always know the current version of Docker you are currently running on at any point in time.This is very helpful because you get to know what features are compatible with what you have running. This is also important because you know what containers to run from the docker store when you are trying to get template containers. That said let see how to know what version of docker we have running currently
- 'docker version' check what version of docker you have running
- [docker version [OPTIONS]]
Get the server version $ docker version --format '{{.Server.Version}}'
1.8.0 Dump raw JSON data $ docker version --format '{{json .}}'
{"Client":{"Version":"1.8.0","ApiVersion":"1.20","GitCommit":"f5bae0a","GoVersion":"go1.4.2","Os":"linux","Arch":"am"}
Cleaning up
While you can use the docker rmi command to remove specific images, there's a tool called docker-gc that will safely clean up images that are no longer used by any containers.
Load/Save image
Load an image from file:
docker load < my_image.tar.gz
Save an existing image:
docker save my_image:my_tag | gzip > my_image.tar.gz
Import/Export container
Import a container as an image from file:
cat my_container.tar.gz | docker import - my_image:my_tag
Export an existing container:
docker export my_container | gzip > my_container.tar.gz
Difference between loading a saved image and importing an exported container as an image
Loading an image using the load command creates a new image including its history.
Importing a container as an image using the import command creates a new image excluding the history which results in a smaller image size compared to loading an image.
Networks
Docker has a networks feature. Not much is known about it, so this is a good place to expand the cheat sheet. There is a note saying that it's a good way to configure docker containers to talk to each other without using ports. See working with networks for more details.
Lifecycle
Info
Connection
You can specify a specific IP address for a container:
# create a new bridge network with your subnet and gateway for your ip block
docker network create --subnet 203.0.113.0/24 --gateway 203.0.113.254 iptastic

# run a nginx container with a specific ip in that block
$ docker run --rm -it --net iptastic --ip 203.0.113.2 nginx

# curl the ip from any other place (assuming this is a public ip block duh)
$ curl 203.0.113.2
Registry & Repository
A repository is a hosted collection of tagged images that together create the file system for a container.
A registry is a host -- a server that stores repositories and provides an HTTP API for managing the uploading and downloading of repositories.
Docker.com hosts its own index to a central registry which contains a large number of repositories. Having said that, the central docker registry does not do a good job of verifying images and should be avoided if you're worried about security.
docker loginto login to a registry.docker logoutto logout from a registry.docker searchsearches registry for image.docker pullpulls an image from registry to local machine.docker pushpushes an image to the registry from local machine.
Run local registry
You can run a local registry by using the docker distribution project and looking at the local deploy instructions.
Also see the mailing list.
Dockerfile
The configuration file. Sets up a Docker container when you run docker build on it. Vastly preferable to docker commit.
Here are some common text editors and their syntax highlighting modules you could use to create Dockerfiles:
- If you use jEdit, I've put up a syntax highlighting module for Dockerfile you can use.
- Sublime Text 2
- Atom
- Vim
- Emacs
- TextMate
- VS Code
- Also see Docker meets the IDE
Instructions
- .dockerignore
- FROM Sets the Base Image for subsequent instructions.
- MAINTAINER (deprecated - use LABEL instead) Set the Author field of the generated images.
- RUN execute any commands in a new layer on top of the current image and commit the results.
- CMD provide defaults for an executing container.
- EXPOSE informs Docker that the container listens on the specified network ports at runtime. NOTE: does not actually make ports accessible.
- ENV sets environment variable.
- ADD copies new files, directories or remote file to container. Invalidates caches. Avoid
ADDand useCOPYinstead. - COPY copies new files or directories to container. Note that this only copies as root, so you have to chown manually regardless of your USER / WORKDIR setting. See https://github.com/moby/moby/issues/30110
- ENTRYPOINT configures a container that will run as an executable.
- VOLUME creates a mount point for externally mounted volumes or other containers.
- USER sets the user name for following RUN / CMD / ENTRYPOINT commands.
- WORKDIR sets the working directory.
- ARG defines a build-time variable.
- ONBUILD adds a trigger instruction when the image is used as the base for another build.
- STOPSIGNAL sets the system call signal that will be sent to the container to exit.
- LABEL apply key/value metadata to your images, containers, or daemons.
Tutorial
Examples
- Examples
- Best practices for writing Dockerfiles
- Michael Crosby has some more Dockerfiles best practices / take 2.
- Building Good Docker Images / Building Better Docker Images
- Managing Container Configuration with Metadata
- How to write excellent Dockerfiles
Layers
The versioned filesystem in Docker is based on layers. They're like git commits or changesets for filesystems.
Links
Links are how Docker containers talk to each other through TCP/IP ports. Linking into Redis and Atlassian show worked examples. You can also resolve links by hostname.
This has been deprected to some extent by user-defined networks.
NOTE: If you want containers to ONLY communicate with each other through links, start the docker daemon with -icc=false to disable inter process communication.
If you have a container with the name CONTAINER (specified by docker run --name CONTAINER) and in the Dockerfile, it has an exposed port:
EXPOSE 1337
Then if we create another container called LINKED like so:
docker run -d --link CONTAINER:ALIAS --name LINKED user/wordpress
Then the exposed ports and aliases of CONTAINER will show up in LINKED with the following environment variables:
$ALIAS_PORT_1337_TCP_PORT
$ALIAS_PORT_1337_TCP_ADDR
And you can connect to it that way.
To delete links, use docker rm --link.
Generally, linking between docker services is a subset of "service discovery", a big problem if you're planning to use Docker at scale in production. Please read The Docker Ecosystem: Service Discovery and Distributed Configuration Stores for more info.
Volumes
Docker volumes are free-floating filesystems. They don't have to be connected to a particular container. You should use volumes mounted from data-only containers for portability.
Lifecycle
Info
Volumes are useful in situations where you can't use links (which are TCP/IP only). For instance, if you need to have two docker instances communicate by leaving stuff on the filesystem.
You can mount them in several docker containers at once, using docker run --volumes-from.
Because volumes are isolated filesystems, they are often used to store state from computations between transient containers. That is, you can have a stateless and transient container run from a recipe, blow it away, and then have a second instance of the transient container pick up from where the last one left off.
See advanced volumes for more details. Container42 is also helpful.
You can map MacOS host directories as docker volumes:
docker run -v /Users/wsargent/myapp/src:/src
You can use remote NFS volumes if you're feeling brave.
You may also consider running data-only containers as described here to provide some data portability.
Be aware that you can mount files as volumes.
Exposing ports
Exposing incoming ports through the host container is fiddly but doable.
This is done by mapping the container port to the host port (only using localhost interface) using -p:
docker run -p 127.0.0.1:$HOSTPORT:$CONTAINERPORT --name CONTAINER -t someimage
You can tell Docker that the container listens on the specified network ports at runtime by using EXPOSE:
EXPOSE <CONTAINERPORT>
Note that EXPOSE does not expose the port itself -- only -p will do that. To expose the container's port on your localhost's port:
iptables -t nat -A DOCKER -p tcp --dport <LOCALHOSTPORT> -j DNAT --to-destination <CONTAINERIP>:<PORT>
If you're running Docker in Virtualbox, you then need to forward the port there as well, using forwarded_port. Define a range of ports in your Vagrantfile like this so you can dynamically map them:
Vagrant.configure(VAGRANTFILE_API_VERSION) do |config|
  ...

  (49000..49900).each do |port|
    config.vm.network :forwarded_port, :host => port, :guest => port
  end

  ...
end
If you forget what you mapped the port to on the host container, use docker port to show it:
docker port CONTAINER $CONTAINERPORT
Best Practices
This is where general Docker best practices and war stories go:
- The Rabbit Hole of Using Docker in Automated Tests
- Bridget Kromhout has a useful blog post on running Docker in production at Dramafever.
- There's also a best practices blog post from Lyst.
- Building a Development Environment With Docker
- Discourse in a Docker Container
Security
This is where security tips about Docker go. The Docker security page goes into more detail.
First things first: Docker runs as root. If you are in the docker group, you effectively have root access. If you expose the docker unix socket to a container, you are giving the container root access to the host.
Docker should not be your only defense. You should secure and harden it.
For an understanding of what containers leave exposed, you should read Understanding and Hardening Linux Containers by Aaron Grattafiori. This is a complete and comprehensive guide to the issues involved with containers, with a plethora of links and footnotes leading on to yet more useful content. The security tips following are useful if you've already hardened containers in the past, but are not a substitute for understanding.
Security Tips
For greatest security, you want to run Docker inside a virtual machine. This is straight from the Docker Security Team Lead -- slides / notes. Then, run with AppArmor / seccomp / SELinux / grsec etc to limit the container permissions. See the Docker 1.10 security features for more details.
Docker image ids are sensitive information and should not be exposed to the outside world. Treat them like passwords.
See the Docker Security Cheat Sheet by Thomas Sjögren: some good stuff about container hardening in there.
Check out the docker bench security script, download the white papers and subscribe to the mailing lists (unfortunately Docker does not have a unique mailing list, only dev / user).
You should start off by using a kernel with unstable patches for grsecurity / pax compiled in, such as Alpine Linux. If you are using grsecurity in production, you should spring for commercial support for the stable patches, same as you would do for RedHat. It's $200 a month, which is nothing to your devops budget.
Since docker 1.11 you can easily limit the number of active processes running inside a container to prevent fork bombs. This requires a linux kernel >= 4.3 with CGROUP_PIDS=y to be in the kernel configuration.
docker run --pids-limit=64
Also available since docker 1.11 is the ability to prevent processes from gaining new privileges. This feature have been in the linux kernel since version 3.5. You can read more about it in this blog post.
docker run --security-opt=no-new-privileges
From the Docker Security Cheat Sheet (it's in PDF which makes it hard to use, so copying below) by Container Solutions:
Turn off interprocess communication with:
docker -d --icc=false --iptables
Set the container to be read-only:
docker run --read-only
Verify images with a hashsum:
docker pull debian@sha256:a25306f3850e1bd44541976aa7b5fd0a29be
Set volumes to be read only:
docker run -v $(pwd)/secrets:/secrets:ro debian
Define and run a user in your Dockerfile so you don't run as root inside the container:
RUN groupadd -r user && useradd -r -g user user
USER user
User Namespaces
There's also work on user namespaces -- it is in 1.10 but is not enabled by default.
To enable user namespaces ("remap the userns") in Ubuntu 15.10, follow the blog example.
Security Videos
- Using Docker Safely
- Securing your applications using Docker
- Container security: Do containers actually contain?
- Linux Containers: Future or Fantasy?
Security Roadmap
The Docker roadmap talks about seccomp support. There is an AppArmor policy generator called bane, and they're working on security profiles.
Tips
Sources:
Prune
The new Data Management Commands have landed as of Docker 1.13:
docker system prunedocker volume prunedocker network prunedocker container prunedocker image prune
df
docker system df presents a summary of the space currently used by different docker objects.
Heredoc Docker Container
docker build -t htop - << EOF
FROM alpine
RUN apk --no-cache add htop
EOF
Last Ids
alias dl='docker ps -l -q'
docker run ubuntu echo hello world
docker commit $(dl) helloworld
Commit with command (needs Dockerfile)
docker commit -run='{"Cmd":["postgres", "-too -many -opts"]}' $(dl) postgres
Get IP address
docker inspect $(dl) | grep -wm1 IPAddress | cut -d '"' -f 4
or install jq:
docker inspect $(dl) | jq -r '.[0].NetworkSettings.IPAddress'
or using a go template:
docker inspect -f '{{ .NetworkSettings.IPAddress }}' <container_name>
or when building an image from Dockerfile, when you want to pass in a build argument:
DOCKER_HOST_IP=`ifconfig | grep -E "([0-9]{1,3}\.){3}[0-9]{1,3}" | grep -v 127.0.0.1 | awk '{ print $2 }' | cut -f2 -d: | head -n1`
echo DOCKER_HOST_IP = $DOCKER_HOST_IP
docker build \
  --build-arg ARTIFACTORY_ADDRESS=$DOCKER_HOST_IP
  -t sometag \
  some-directory/
Get port mapping
docker inspect -f '{{range $p, $conf := .NetworkSettings.Ports}} {{$p}} -> {{(index $conf 0).HostPort}} {{end}}' <containername>
Find containers by regular expression
for i in $(docker ps -a | grep "REGEXP_PATTERN" | cut -f1 -d" "); do echo $i; done
Get Environment Settings
docker run --rm ubuntu env
Kill running containers
docker kill $(docker ps -q)
Delete all containers (force!! running or stopped containers)
docker rm -f $(docker ps -qa)
Delete old containers
docker ps -a | grep 'weeks ago' | awk '{print $1}' | xargs docker rm
Delete stopped containers
docker rm -v $(docker ps -a -q -f status=exited)
Delete containers after stopping
docker stop $(docker ps -aq) && docker rm -v $(docker ps -aq)
Delete dangling images
docker rmi $(docker images -q -f dangling=true)
Delete all images
docker rmi $(docker images -q)
Delete dangling volumes
As of Docker 1.9:
docker volume rm $(docker volume ls -q -f dangling=true)
In 1.9.0, the filter dangling=false does not work - it is ignored and will list all volumes.
Show image dependencies
docker images -viz | dot -Tpng -o docker.png
Slimming down Docker containers
- Cleaning APT in a RUN layer
This should be done in the same layer as other apt commands. Otherwise, the previous layers still persist the original information and your images will still be fat.
RUN {apt commands} \
 && apt-get clean \
 && rm -rf /var/lib/apt/lists/* /tmp/* /var/tmp/*
- Flatten an image
ID=$(docker run -d image-name /bin/bash)
docker export $ID | docker import – flat-image-name
- For backup
ID=$(docker run -d image-name /bin/bash)
(docker export $ID | gzip -c > image.tgz)
gzip -dc image.tgz | docker import - flat-image-name
Monitor system resource utilization for running containers
To check the CPU, memory, and network I/O usage of a single container, you can use:
docker stats <container>
For all containers listed by id:
docker stats $(docker ps -q)
For all containers listed by name:
docker stats $(docker ps --format '{{.Names}}')
For all containers listed by image:
docker ps -a -f ancestor=ubuntu
Remove all untagged images
docker rmi $(docker images | grep “^” | awk '{split($0,a," "); print a[3]}')
Remove container by a regular expression
docker ps -a | grep wildfly | awk '{print $1}' | xargs docker rm -f
Remove all exited containers
docker rm -f $(docker ps -a | grep Exit | awk '{ print $1 }')
Volumes can be files
Be aware that you can mount files as volumes. For example you can inject a configuration file like this:
# copy file from container
docker run --rm httpd cat /usr/local/apache2/conf/httpd.conf > httpd.conf

# edit file
vim httpd.conf

# start container with modified configuration
docker run --rm -ti -v "$PWD/httpd.conf:/usr/local/apache2/conf/httpd.conf:ro" -p "80:80" httpd
Contributing
Here's how to contribute to this cheat sheet.
Open README.md
Click README.md <-- this link

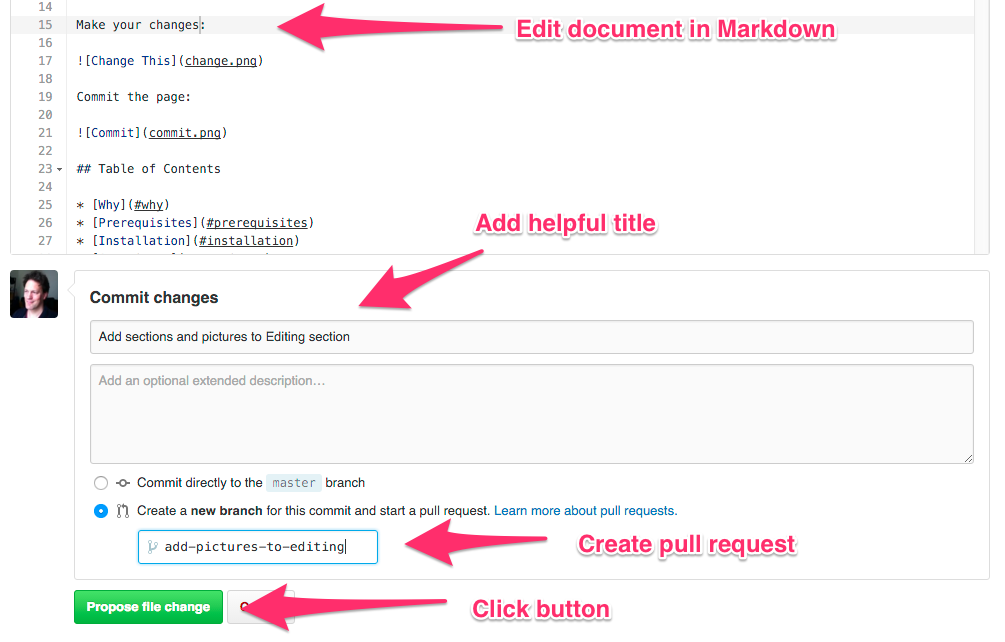
Edit Page

Make Changes and Commit